We knew this was a long time coming, and it’s finally here.
The Angular Team has announced that they will soon release AngularJS 1.7.0, which will be the last minor release.
What will happen now?
Regular development of 1.7 will continue, meaning we can expect 1.7.1, 1.7.2, etc. until June 30, 2018.
All these releases will contain bug fixes and features that are not breaking changes.
What will happen next?
After June 30, AngularJS 1.7 will go into Long Term Support.
This means that for 3 years the Angular team will support AngularJS and make changes to make sure it continues functioning.
There will be no new features.
Bug fixes will only be released in case a security flaw is found, or if a change to jQuery or a major browser breaks 1.7.
Why now?
Google say that in October 2017 the number of active Angular (that is, 2+) developers has surpassed that of AngularJS developers, which was their cue all along to when they can start wrapping up 1.x.
1.7 will be released soon, but it will also remove lots of deprecated APIs, meaning you can expect to need to change older code and update older dependencies.
And then what?
Hmm.
That’s a tough one.
I’ll be talking about it some more in the upcoming future, so make sure the sign up below!
“Maintaining AngularJS feels like Cobol 🤷…”
You want to do AngularJS the right way.
Yet every blog post you see makes it look like your codebase is obsolete.
Components? Lifecycle hooks? Controllers are dead?
It would be great to work on a modern codebase again, but who has weeks for a rewrite?
Well, you can get your app back in shape, without pushing back all your deadlines!
Imagine, upgrading smoothly along your regular tasks, no longer deep in legacy.
Subscribe and get my free email course with steps for upgrading your AngularJS app
to the latest 1.6 safely and without a rewrite.
Success! You rock. You'll get some knowledge shipped to your inbox soon. Let's do this!
You’re working on a new feature, or trying to track down a bug.
Something’s just not working as you expect it to be, what do you do?
Usually, I just add console.log as necessary, or add breakpoints.
But, sometimes, I want to look at data as it currently is, without triggering a refresh.
In those situations, I love using AngularJS’s helpers that make a lot of the needed information available right in the browser’s console.
Set up
First, pick the relevant element in Chrome/Safari’s developer tools – either right-click and “Inspect Element”, or pick it on the elements panel.
On these browsers (maybe others as well, but I rarely develop on them), the element you have currently selected is available in the console using the $0 variable.
And now, you can get access to the AngularJS element by writing angular.elemen($0).
While you may know this as the jqLite interface, it has some handy utilities for debugging.
Debugging with angular.element
.scope()
This function returns the Scope that’s associated with this element.
Super handy for poking around to see that all the values are set up as you expect.
You can also make changes to values on the scope, or call functions, but in those scenarios it’s recommended to follow up by running angular.element($0).scope().$apply(), to make sure your changes are properly applied.
A nitpick detail is that in some cases you might want to call .isolateScope() instead, see the docs.
.controller()
Similarly, this returns the controller that’s associated with the current element.
In the rare case that an element has multiple controllers and you’re interested in a specific one, e.g. ngModel, you can pass the function the name of the controller that you want.
Now with components, where you should be rarely exposing data directly on the scope, accessing the controller is nice, though this is usually synonym with angular.element($0).scope().$ctrl.
.injector()
This is especially handy for the heavier debugging sessions, where you’re knee-deep in chaos.
In those scenarios, sometimes you need to resort to calling all sorts of services on your own directly from the console, and injector enables just that.
For example, if your app has a UsersService, you can get a reference to it using angular.element($0).injector().get('UsersService').
Happy debugging!
“Maintaining AngularJS feels like Cobol 🤷…”
You want to do AngularJS the right way.
Yet every blog post you see makes it look like your codebase is obsolete.
Components? Lifecycle hooks? Controllers are dead?
It would be great to work on a modern codebase again, but who has weeks for a rewrite?
Well, you can get your app back in shape, without pushing back all your deadlines!
Imagine, upgrading smoothly along your regular tasks, no longer deep in legacy.
Subscribe and get my free email course with steps for upgrading your AngularJS app
to the latest 1.6 safely and without a rewrite.
Success! You rock. You'll get some knowledge shipped to your inbox soon. Let's do this!
When you started working on your codebase, you probably set it up with the latest versions of all your dependencies–Angular, React, Node, the whole shebang.
And at the early stages of a project, especially before going live, it’s relatively easy and fun to always be using the latest shiny.
But, eventually you come across a problem.
Simply updating some dependency has caused an issue that may just have cost you some time debugging, and at worst has caused a major issue that was only found out some time later.
Once these happen once or twice, I see my clients go from trigger-happy-update-hippies to get-off-my-lawn only-update-if-absolutely-necessary-sceptics.
And, frankly, it’s hard to blame them.
Especially after a few too many times of playing whack-a-mole with issues that surface because of an update, and later realizing that had you just waited a month or so, most of these issues would already be gone (e.g. because they would get fixed, or because other people would have already tackled them on Stack Overflow).
But once you go into the never-upgrade camp, you’re setting yourself up for issues later on again.
For example, eventually one of your dependencies will have an important fix/feature that you want now, but upgrading it requires upgrading other dependencies.
But, since things have been left stale, you have to sift through so many breaking changes of dependencies, and that’s if you’re lucky and the dependencies have proper documentation.
For example, I recently saw a client that needed a simple update to their e2e testing framework require upgrading 8 more direct dependencies, some as major as “oh, we need to upgrade a major Node version for this and update our CI chain with it”.
Ain’t nobody got time for that!
The Just-Right Upgrade Path
The pragmatic solution, maybe obvious at this point, is to have a process for upgrading gradually and with a schedule.
If you’re in it for the long game, and plan on supporting your product for years on, you have to get some recurring task that reminds you to go over your dependencies and see which have updates that are, say, a month old.
Go over those, read their changelogs, make the changes necessary to upgrade and test things in isolation.
Yeah, it’s a hassle to do this in an ongoing fashion, but from my experience it’s always easier than dragging it out until the absolute last minute, when you’ve already got balls to the wall.
“Maintaining AngularJS feels like Cobol 🤷…”
You want to do AngularJS the right way.
Yet every blog post you see makes it look like your codebase is obsolete.
Components? Lifecycle hooks? Controllers are dead?
It would be great to work on a modern codebase again, but who has weeks for a rewrite?
Well, you can get your app back in shape, without pushing back all your deadlines!
Imagine, upgrading smoothly along your regular tasks, no longer deep in legacy.
Subscribe and get my free email course with steps for upgrading your AngularJS app
to the latest 1.6 safely and without a rewrite.
Success! You rock. You'll get some knowledge shipped to your inbox soon. Let's do this!
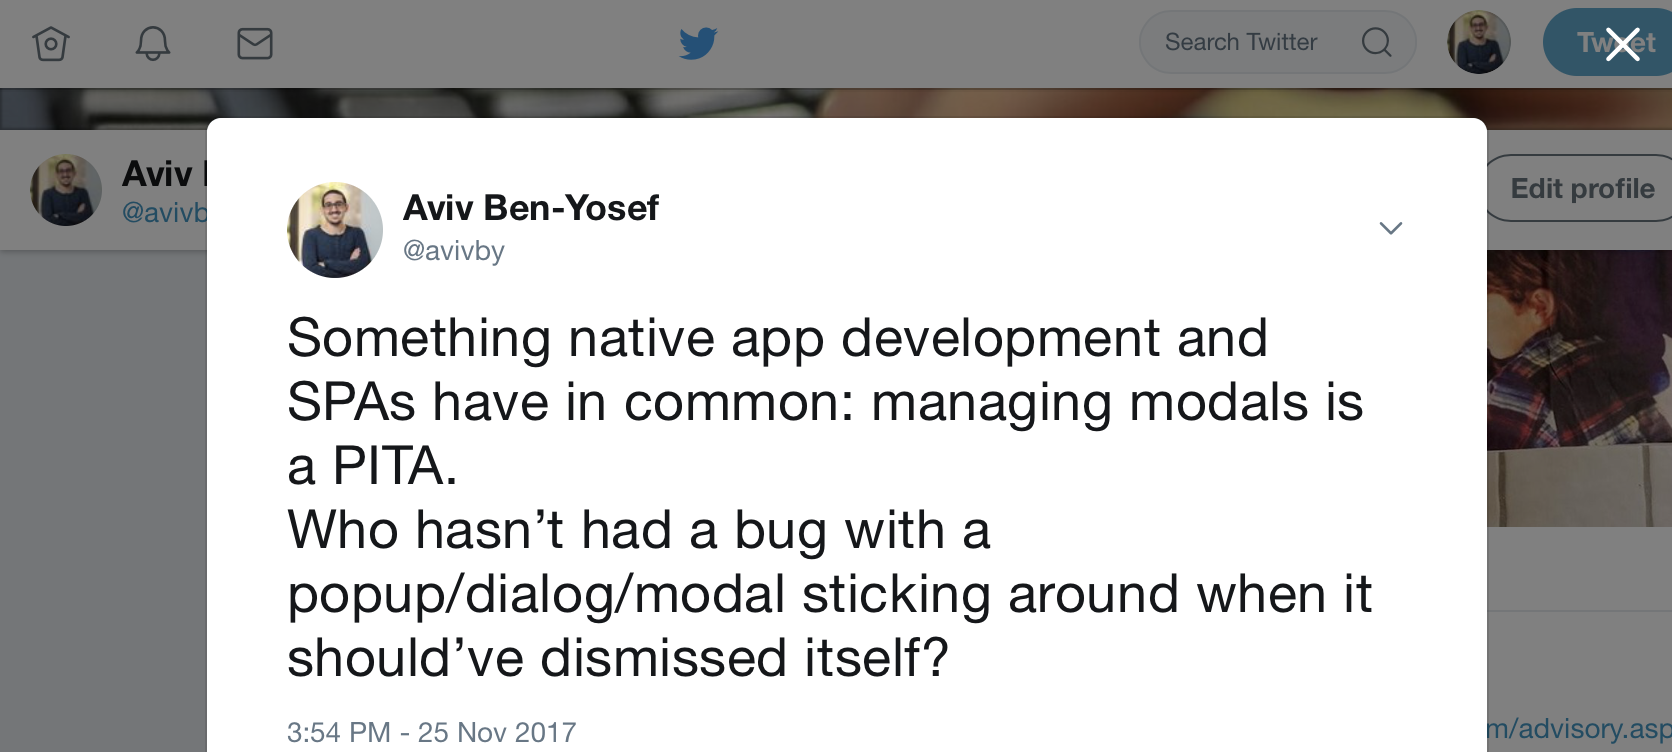
The devil’s in the details, and you know what’s full of details?
Managing modals, popups and dialogs in a single page app.
You want to reliably display them, yet it’s super easy to have bugs turning up with them, such as a modal staying stuck on top of your UI even though the underlying state has changed.
For example, Twitter’s current UI whenever you click a tweet’s timestamp, that tweet is displayed as a modal on top of the current page you’re on:
And from that screen you can stack up even more modals, e.g. by clicking to view who liked or retweeted that tweet.
Managing all those modals can be a PITA.
You have to make sure clicking a link that goes someplace else dismisses all the modals that should be dismissed.
And on the other hand, you have to make sure that dismissing the modal, e.g. by clicking that X button, results in the state changing together.
I’ve often seen this result in lots of copy-pasted code for handling dismissals and listening for state changes to clear things up.
(Actually, while playing around with Twitter to get the screenshot for this post I noticed that simply clicking through some modals breaks things in twitter such as history in some of the cases…)
But, it doesn’t have to be this hairy and buggy.
You don’t have to keep adding more and more checks for removing your modals everywhere in the hopes of it actually sticking.
With the right design decisions, modals can work almost as seamlessly as regular bindings in AngularJS.
Reliable Modals
A reliable pattern that I’ve seen successfully implemented at several clients is to bind modals to a matching router state.
There are different ways this can be done, but the important issue is accepting the idiom that modals shouldn’t ever cross state changes – if a state is left, the modals it introduced should be cleared.
Let the new state start fresh and clean of the previous thing.
The simple way – auto dismissals
This is by far the simplest way to make sure modals never stick around, and it works for apps with simple modal use.
I’ve seen this working for years at several places and reliably.
Essentially, you register a state change listener in your router and whenever there’s a state change you make sure to dismiss all open modals, whatever those might be.
Again, this might seem harsh, but in some apps this works like a charm, and is better than nothing.
A simple example, using UI Router’s $transition service and Angular UI Bootstrap’s $uibModalStack, this can be as simple as:
And of course, if needed, you can only perform this for transitions that match a specific criteria.
Hard binding modals and states
The hard binding solution is also the harder way, but it provides more flexibility and control.
In this pattern, we configure the different states so that whenever a state is opened, a specific modal is initialized.
Whenever that state is transitioned from, that same specific modal is dismissed.
And, lastly, we make sure that if the modal is dismissed (e.g. by clicking a little ‘X’) the state itself is transition out from, usually by going to its parent state.
For example, the tweet details modals from the screenshot above might be defined like this state:
Breaking this down, first look at the line marked with 1.
onEnter is called as the state is initialized, and then we immediately open up the modal that is bound to this state.
Similarly, on line 2, we make sure to use onExit to be notified of when the state is transitioned from and dismiss the modal in case it’s still there.
Finally, on line 3, we make absolutely sure that any dismissal of the modal, for any reason, will also result in a transition to a proper state.
We do that by adding a finally callback to the modal’s dismissal promise.
This boils down to manually wiring two-way binding between the state and the modal, and it achieves air-tight confidence in your modals playing along nicely.
“Maintaining AngularJS feels like Cobol 🤷…”
You want to do AngularJS the right way.
Yet every blog post you see makes it look like your codebase is obsolete.
Components? Lifecycle hooks? Controllers are dead?
It would be great to work on a modern codebase again, but who has weeks for a rewrite?
Well, you can get your app back in shape, without pushing back all your deadlines!
Imagine, upgrading smoothly along your regular tasks, no longer deep in legacy.
Subscribe and get my free email course with steps for upgrading your AngularJS app
to the latest 1.6 safely and without a rewrite.
Success! You rock. You'll get some knowledge shipped to your inbox soon. Let's do this!
A very common head-scratch moment with AngularJS is whenever one needs to decide on how to communicate and pass information between a couple of components.
As you learn more about AngularJS it actually gets more confusing, since there seem to be so many ways, which is the right one for your scenario?
I compiled here the common patterns and anti-patterns, sorted and listed from you-should-probably-use-this all the way to please-god-no.
Always use when possible
Bindings
Bindings essentially mean passing a callback function a child component so it can call back on the parent.
Use this whenever a child needs to pass information to its direct parent, e.g. a button was clicked or an error occurred.
$onChanges
The $onChanges lifecycle hook, which I covered here, coupled with one-way data flow, can be used as the opposite of callback bindings.
By supplying a one-way binding (<) to a child component, the parent can essentially trigger behavior in the child by overriding the binding value with a new one, causing the child’s $onChanges to be called.
Then, the child component can see which binding has changed and to which value, and act accordingly.
Use with care
Having to use these might mean that you’re doing something a bit too complicated, but not always.
Require
The require mechanism is strong and provides a lot of power, as described here and here.
It can really simplify complex component families.
And yet, don’t be trigger-happy about using it, since it also adds complexity.
Add a service with extra state
This actually has been the go-to solution for most non-obvious communication patterns in the AngularJS of old.
People would just create these services which essentially were just global state, and inject them everywhere that needed access to something.
Frankly, these are just a tiny bit better than putting lots of crap on your $rootScope and I don’t think it should be used in most codebases more than handful of times, and kept to a minimum.
Try to never use unless absolutely necessary
$watch
Well, $watch is still useful, of course, when you have to deeply watch some object, or when integrating with external libraries that don’t expose proper events or promises.
And yet, these are rare scenarios.
If all you need to do is know when a binding you got is changed, push that code to $onChanges and be done with it.
Never use
(Well, 99.9999% of the cases)
Events
AngularJS’s scopes have broadcasting capabilities, e.g. $broadcast and $emit.
These allow passing messages between parent and child components across multiple layers.
Having worked on dozens of AngularJS projects, I frankly don’t believe I cam across a codebase that incorporated these as a standard pattern and didn’t come to regret it later.
Events, when used freely, usually end up causing code to be come a big spaghetti mess.
Do note though, that there are cases these events are useful, e.g. for implementing some sort of subscription mechanism for listening to changes in external data, like in your Store services.
You can see an example of such a service here.
Did I miss any important patterns?
Let me know!
“Maintaining AngularJS feels like Cobol 🤷…”
You want to do AngularJS the right way.
Yet every blog post you see makes it look like your codebase is obsolete.
Components? Lifecycle hooks? Controllers are dead?
It would be great to work on a modern codebase again, but who has weeks for a rewrite?
Well, you can get your app back in shape, without pushing back all your deadlines!
Imagine, upgrading smoothly along your regular tasks, no longer deep in legacy.
Subscribe and get my free email course with steps for upgrading your AngularJS app
to the latest 1.6 safely and without a rewrite.
Success! You rock. You'll get some knowledge shipped to your inbox soon. Let's do this!
If you’ve updated to AngularJS 1.6.x, kudos!
There’s not much that’s needed to get an app running with 1.5 to work with 1.6.
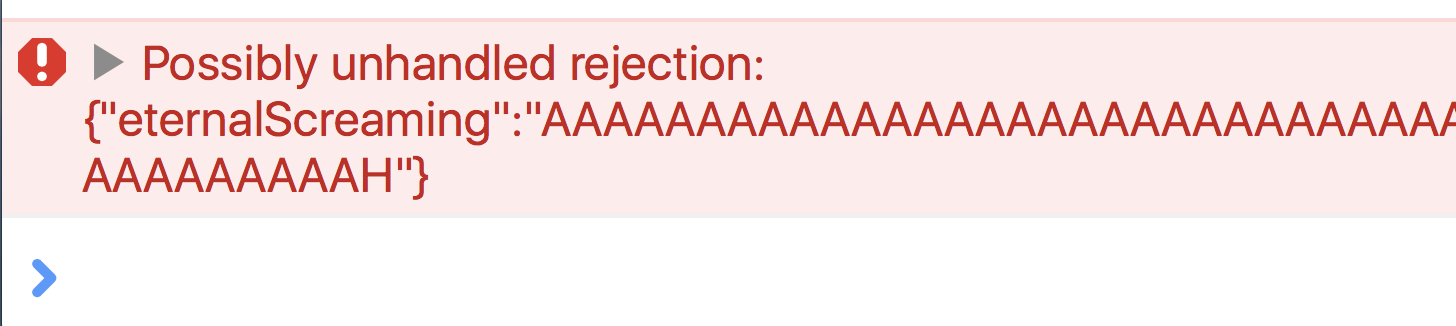
But, a very common error that starts appearing in people’s consoles after this upgrade is the dreaded ”Possibly unhandled rejection” error.
Did you see this and wonder what does this mean?
And more importantly, how the hell do you get rid of it?
Worse, if you just follow the highest voted answer on StackOverflow you probably hide bugs and won’t be aware of it.
Read on for the full gist.
What does this error mean?
Essentially, this error is printed to the console whenever a promise in your app is rejected (resolved with a failure), and there’s no .catch() block to handle that failure.
AngularJS added this to nudge developers to always handle possible errors.
This is much like always adding an else to every if to make sure you handle error cases, etc.
After all, every unhandled rejection might be an error that you forgot to account for, a bug waiting to happen.
A very common reason for it to come up in apps is things like modals being dismissed or “canceled”, and since the app has nothing to do in those scenarios the rejected promise goes unhandled.
Getting rid of it – the icky way
The Stack Overflow answer I linked to above basically shows you how to disable this new behavior introduced in 1.6:
You might be tempted to just reach for this quick fix, but be aware that it doesn’t 100% resemble that behavior in 1.5.
The catch
Say that you make a simple typo, like we all do like 20 times a day.
For example, you’re handling a response from $http that looks like this: {value: "stuff"}.
Of course, I mistyped value as valye.
This code in version 1.5.x would result in an error in your console.
So would it in 1.6, unless you turn off unhandled rejection errors.
If you do it, this error would be swallowed, and you’ll be spending lots and lots of time debugging stuff.
That’s why I recommend solving this the right way, even though it might take more typing, unless you really really have no other choice.
Getting rid of it – the right way
Well, the trick to not having unhandled rejection errors is… well… handling them.
You should, after every every promise with a .then() block have a .catch() block (and no, .finally() blocks don’t help here):
And what about cases where you absolutely don’t care about errors?
The convention I’d have to recommend is explicitly handling errors in a way that says you’re aware of possible errors and don’t care:
We’re passing as a handler the angular.noop function, which a function that does… nothing.
It’s the equivalent of function() {}.
This saves you some typing, and whenever I see noop as opposed to an empty function, I know it was left there by intention, and not that someone forgot what they were doing half way through a commit.
Yeah, this is some more typing, but it’s all in favor of making more robust and bug-free apps.
And I recommend setting up a shortcut in your favorite editor to add this (e.g. my TextExpander is set up to write .catch(angular.noop) whenever I type ;noop).
Happy erring!
“Maintaining AngularJS feels like Cobol 🤷…”
You want to do AngularJS the right way.
Yet every blog post you see makes it look like your codebase is obsolete.
Components? Lifecycle hooks? Controllers are dead?
It would be great to work on a modern codebase again, but who has weeks for a rewrite?
Well, you can get your app back in shape, without pushing back all your deadlines!
Imagine, upgrading smoothly along your regular tasks, no longer deep in legacy.
Subscribe and get my free email course with steps for upgrading your AngularJS app
to the latest 1.6 safely and without a rewrite.
Success! You rock. You'll get some knowledge shipped to your inbox soon. Let's do this!
In the last post I explained that developers have a lot to gain by making sure their custom controls work properly with ng-model.
That post shows the starting point – making trivial things like the required validation work and having the form’s $validproperty take into account custom controls.
But that’s just the tip of the iceberg, and ng-model allows for quite a bit more customization and integration in order to allow writing controls that work as smoothly as builtin ones.
In this post I’ll how to start integrating your control with the NgModelController and make your controls more capable and robust.
Our Starting Position
Let’s keep going with the example from the previous post, which was this very simple component:
By supplying name="foo" we can now access it from the form to make sure it’s valid, e.g. $ctrl.form.foo.$valid.
Changing Values Properly
In order to make our component work seamlessly with ng-change we will need to make sure that whenever the control’s value is changed as a result of a user interaction (not programmatically), we let NgModelController know.
First, we will need to make sure to require the NgModelController, and then, when the user clicks a button, invoke $setViewValue:
The important bits here are the require definition and the handling of the user’s click in userToggledOn, which calls NgModelController’s $setViewValue.
Note that second parameter which lets it know what kind of DOM event triggered the change.
Defining emptiness
In my previous post I showed how required can simply be dropped in and used once ng-model is in place.
That’s only the case, though, if your definition of “emptiness” matches the default logic as described in the documentation.
But in case your control’s logic doesn’t match this, e.g. your model is an array and emptiness means the array is empty, you should override this behavior to let NgModelController know what you expect.
Inside your controller, after requiring ngModel as shown above, do this:
As you can see, we’re overriding the $isEmpty method, which is intended exactly for this purpose.
Also, note I’m making sure to access ngModelCtrl on $onInit, since it will not be defined earlier.
Handling Programatic Changes
An important part of the integration is to make sure the view is changed whenever the model value gets changed programmatically.
For example, if the control’s ng-model attribute is a binding from its parent, and the parent changes that value, it usually means that the control should update the UI in order to show this state (e.g. because an update was received from the server).
In those scenarios, NgModelController expects us to override the $render method.
NgModelController places a $watch on its value, and calls $render when it needs to change (though, note this watch is a shallow watch. If you’re mutating an object as your model, you will need to trigger it manually).
This would look roughly like so:
123456789
functionSomeCtrl(){varself=this;self.$onInit=function(){// ... previous stuffself.ngModelCtrl.$render=function(){// Update the UI according to the self.ngModelCtrl.$viewValue}};}
That’s it for now.
There’s much more to ng-model, e.g. parsers and formatters that are handy when you want specific validations on inputs, etc.
To be updated when I write about it, subscribe in the form below!
“Maintaining AngularJS feels like Cobol 🤷…”
You want to do AngularJS the right way.
Yet every blog post you see makes it look like your codebase is obsolete.
Components? Lifecycle hooks? Controllers are dead?
It would be great to work on a modern codebase again, but who has weeks for a rewrite?
Well, you can get your app back in shape, without pushing back all your deadlines!
Imagine, upgrading smoothly along your regular tasks, no longer deep in legacy.
Subscribe and get my free email course with steps for upgrading your AngularJS app
to the latest 1.6 safely and without a rewrite.
Success! You rock. You'll get some knowledge shipped to your inbox soon. Let's do this!
You sit down and start your next frontend task.
Likely, that task will require you to get input from the user.
Maybe you’re adding a comments section, maybe it’s a little survey, or some simple form.
Handling inputs and forms with AngularJS can be a breeze, especially since AngularJS provides a lot of tools for efficiently doing just that.
You need to add validations, like making sure the user filled all the fields, and it’s just a matter of adding a required attribute to all controls and checking the form’s $valid property.
I love it when instead of writing lots of code I simply do something along the lines of:
And suddenly, you can’t just use required, and the form’s $valid doesn’t work, and instead of using $ctrl.form.$valid to check everything is filled you have to write code along the lines of:
You don’t have to leave the comforts of Angular’s forms just because you have a custom control.
You just need to make sure to wire things up properly.
It’s as easy as using ng-model to pass the value to the control, instead of some binding of yours.
Here’s an example of refactoring a component to use ngModel:
You can still use the same name the component used before, such as value above, but make sure that the external name is ngModel.
Using that component looks like so:
Just by using the ng-model attribute, Angular’s ngModel directive will be used, and sprinkle its own magic.
That means that it’ll register with the parent form, and add the needed validations.
For example, the required above will simply work now, and so will our original button, no need for custom code.
So please don’t write custom controls like an animal.
Use Angular properly.
“Maintaining AngularJS feels like Cobol 🤷…”
You want to do AngularJS the right way.
Yet every blog post you see makes it look like your codebase is obsolete.
Components? Lifecycle hooks? Controllers are dead?
It would be great to work on a modern codebase again, but who has weeks for a rewrite?
Well, you can get your app back in shape, without pushing back all your deadlines!
Imagine, upgrading smoothly along your regular tasks, no longer deep in legacy.
Subscribe and get my free email course with steps for upgrading your AngularJS app
to the latest 1.6 safely and without a rewrite.
Success! You rock. You'll get some knowledge shipped to your inbox soon. Let's do this!
Essentially every single web application being developed out there gets inputs from its users.
Maybe it’s got a comment feed with a few text boxes.
Or maybe it has some sort of calculator with different inputs and sliders.
Of course, there’s almost always the login page.
Yes, the email and password are inputs as well.
When working on web apps you’re going to be handling inputs quite a bit, and if so, you should be well equipped to use the right tools for the job.
With AngularJS, those tools should include the extensive support for forms, inputs and validations.
I’ve covered the basics of writing forms before, but in this article I’d like to point out how Angular’s forms have a few magic properties that are worth knowing, since they can spare you some bugs and code!
First Things First: Getting Access to the Form
Forms in AngularJS have special properties, but how exactly are you meant to get access to these forms?
The trick is to name the form.
Once provide a name for your forms, AngularJS will automatically expose it under that name in your scope.
For example, say that we have this as part of the template of a component with $ctrl as its controller-as name:
123
<formname="$ctrl.exampleForm"><!-- inputs etc. go here.. --></form>
Setting the name to $ctrl.exampleForm means that in the template we can get access to the form, simply by using $ctrl.exampleForm.
It can also be accessed from the controller’s code, using this.exampleForm.
Now that we know how to get access to the form, let’s start making use of it!
Testing Whether the User Has Interacted With the Form
A very common use case is the need to display certain error messages or help tips only after the user has started changing values in the form (or hasn’t started yet).
To do just that, forms in AngularJS come supplied with two handy boolean properties, $pristine and $dirty.
These two booleans are always the negative of the other (i.e. $pristine === !$dirty).
When the form is in its virgin state and the user hasn’t changed anything yet, $pristine is set to true.
Once the user has interacted with the form’s inputs, $pristine is set to false and $dirty is true.
In case you need to programmatically force the form back to its pristine state (e.g. the user clicked on reset, or after a successful save), you can call $ctrl.exampleForm.$setPristine().
Display Things After Form Submission
Sometimes, we want form validations to only be displayed after the user has clicked the save button, instead of changing as the user types or moves between fields.
In those cases, simply hiding validations until the form becomes $dirty won’t do, which is exactly why forms also have the handy $submitted property.
This property gets set to true once the user has submitted the form, even if the form is invalid.
Submitting a form means clicking a button that has the attribute type="submit", or pressing Enter/Return inside an input.
AngularJS won’t prevent the form from being submitted if it’s invalid, meaning your ng-submit callback is called.
You need to make sure not to act in case the form isn’t in a valid state.
Checking if the Form Is Valid
And just in order to check whether the form is valid or not, forms come equipped with a few more swanky properties.
First of all are the $valid and $invalid couple.
If $valid is true – go right ahead.
If $invalid is true – something is amiss.
In case the form is invalid, the form’s $error hash will contain all the necessary information about which fields are invalid and for what validations.
But, there’s another state here, which is when both are undefined.
This is possible when the form has asynchronous validators.
This means that it’s important to test these are true or false and not just “falsy” (e.g. undefined or null).
You can also check whether the form is currently pending, and see which of the validators are being processed, by accessing the $pending hash (which is structured similarly to $error).
There’s lots more that can be written about forms and their inputs in AngularJS, so if you’d like to hear more please subscribe below!
“Maintaining AngularJS feels like Cobol 🤷…”
You want to do AngularJS the right way.
Yet every blog post you see makes it look like your codebase is obsolete.
Components? Lifecycle hooks? Controllers are dead?
It would be great to work on a modern codebase again, but who has weeks for a rewrite?
Well, you can get your app back in shape, without pushing back all your deadlines!
Imagine, upgrading smoothly along your regular tasks, no longer deep in legacy.
Subscribe and get my free email course with steps for upgrading your AngularJS app
to the latest 1.6 safely and without a rewrite.
Success! You rock. You'll get some knowledge shipped to your inbox soon. Let's do this!
I have to say that some of the most annoying production bugs I’ve encountered with AngularJS apps are the injection errors: Unknown provider: tProvider <- t.
That error message is actually Angular trying to tell us that it doesn’t know where to inject t from, yet of course my code doesn’t have an injectable dependency called t.
These errors almost never show up during development, but only after building the app for release.
That’s because these problems are the result of minification, which usually isn’t setup to run during development (for easier debugging and faster build times).
In most online examples we’d simply write an injectable like so:
123
app.factory('Foo',function($http){// Angular will inject $http});
But, after minification Angular won’t be able to tell what to inject because argument names get mangled.
That’s why Angular has its special injection annotations, e.g.:
These are of course a PITA to maintain, which is why I strongly recommend using an automatic took like babel-plugin-angularjs-annotate.
But even when using it, one can forgot to write the 'ngInject'; directive somewhere.
In those scenarios, you’d normally only understand that there’s a problem in production, which is too late (and if you’re testing properly, it just means you’re pushing bugs too late into your development process anyway).
The Solution: Strict Mode
Strict mode is a configuration of Angular’s $injector, telling it not to accept injectables that aren’t annotated, even when running in development.
(Note, this should not be confused with ES5’s strict mode.)
You set it by adding the ng-strict-di attribute to your ng-app element:
1
<bodyng-app="app"ng-strict-di>
When you turn this switch on, AngularJS will throw an error whenever it encounters an injectable that’s missing proper annotations, even in development.
This means you’ll get a clearer error that’s a lot easier to track down and at the right time.
It does mean, though, that you should make sure to run your automatic annotator in development as well (which should be easy with babel-plugin-angularjs-annotate).
Switch strict mode on and save yourself some nasty debugging!
“Maintaining AngularJS feels like Cobol 🤷…”
You want to do AngularJS the right way.
Yet every blog post you see makes it look like your codebase is obsolete.
Components? Lifecycle hooks? Controllers are dead?
It would be great to work on a modern codebase again, but who has weeks for a rewrite?
Well, you can get your app back in shape, without pushing back all your deadlines!
Imagine, upgrading smoothly along your regular tasks, no longer deep in legacy.
Subscribe and get my free email course with steps for upgrading your AngularJS app
to the latest 1.6 safely and without a rewrite.
Success! You rock. You'll get some knowledge shipped to your inbox soon. Let's do this!